ngx_event_core_module模块属于事件模块,它是其他事件类模块的基础。它主要完毕下面任务:
- 创建连接池
- 决定使用哪些事件驱动机制
- 初始化将要使用的事件模块
以下分析该模块的代码。
ngx_event_core_module的ngx_command_t数组定义例如以下:
/* ngx_event_core_module对7个配置项感兴趣 */static ngx_command_t ngx_event_core_commands[] = { /* 一个worker进程的最大TCP连接数 */ { ngx_string("worker_connections"), NGX_EVENT_CONF|NGX_CONF_TAKE1, ngx_event_connections, 0, 0, NULL }, /* 同上 */ { ngx_string("connections"), NGX_EVENT_CONF|NGX_CONF_TAKE1, ngx_event_connections, 0, 0, NULL }, /* 确定选择哪一个事件模块作为事件驱动机制 */ { ngx_string("use"), NGX_EVENT_CONF|NGX_CONF_TAKE1, ngx_event_use, 0, 0, NULL }, /* 当有连接事件时,尽可能多地建立连接 */ { ngx_string("multi_accept"), NGX_EVENT_CONF|NGX_CONF_FLAG, ngx_conf_set_flag_slot, 0, offsetof(ngx_event_conf_t, multi_accept), NULL }, /* 确定是否使用负载均衡锁 */ { ngx_string("accept_mutex"), NGX_EVENT_CONF|NGX_CONF_FLAG, ngx_conf_set_flag_slot, 0, offsetof(ngx_event_conf_t, accept_mutex), NULL }, /* 启用负载均衡锁后,延迟accept_mutex_delay毫秒再处理新连接事件 */ { ngx_string("accept_mutex_delay"), NGX_EVENT_CONF|NGX_CONF_TAKE1, ngx_conf_set_msec_slot, 0, offsetof(ngx_event_conf_t, accept_mutex_delay), NULL }, /* 对指定IP的TCP连接打印debug级别的调试日志 */ { ngx_string("debug_connection"), NGX_EVENT_CONF|NGX_CONF_TAKE1, ngx_event_debug_connection, 0, 0, NULL }, ngx_null_command}; 有几个配置项的解析使用的是Nginx预设的方法,解析出来的參数存放在ngx_event_conf_t结构体中。该结构体定义例如以下:
/* 相应ngx_event_core_commands数组中解析配置项的7个方法 */typedef struct { ngx_uint_t connections; /* 连接池大小 */ ngx_uint_t use; /* 该模块在事件模块中的编号。也就是ngx_module_s.ctx_index */ ngx_flag_t multi_accept; /* 1表示一次建立尽可能多的连接 */ ngx_flag_t accept_mutex; /* 1表示启用负载均衡锁 */ ngx_msec_t accept_mutex_delay; /* 拿不到负载均衡锁时延迟建立连接的时间 */ u_char *name; /* 所选用事件模块的名字 */#if (NGX_DEBUG) ngx_array_t debug_connection; /* 调试用 */#endif} ngx_event_conf_t; // 存储事件类配置项的结构体 以下再看看事件模块的通用接口ngx_event_module_t结构体的定义:
ngx_event_module_t ngx_event_core_module_ctx = { &event_core_name, ngx_event_core_create_conf, /* create configuration */ ngx_event_core_init_conf, /* init configuration */ /* 定义事件驱动模块的核心方法 * ngx_event_core_module不负责TCP网络事件的驱动,所以无须定义这些方法 */ { NULL, NULL, NULL, NULL, NULL, NULL, NULL, NULL, NULL, NULL }}; 从上面的通用接口能够看到。ngx_event_core_module模块并未定义10个抽象方法。
由于事件驱动模块是诸如epoll、select这样具有事件驱动机制的模块来担当的,这些模块才须要提供函数接口,以便将事件加入或删除。而ngx_event_core_module模块的作用仅仅是管理更下层的事件驱动模块,比如ngx_epoll_module、ngx_kqueue_module、ngx_poll_module等模块。
以下是整个ngx_module_t结构体的定义:
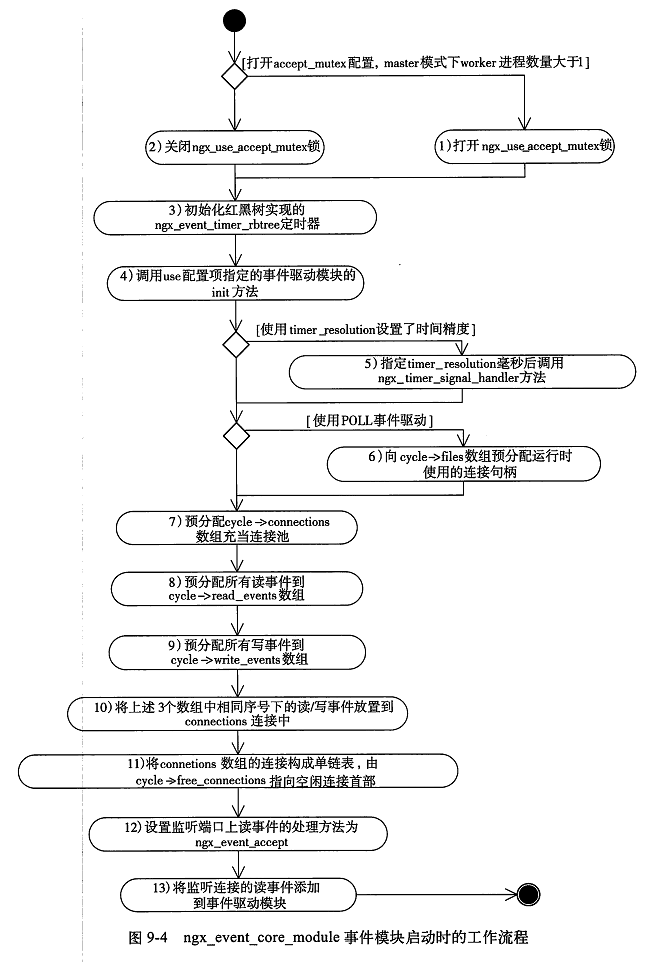
ngx_module_t ngx_event_core_module = { NGX_MODULE_V1, &ngx_event_core_module_ctx, /* module context */ ngx_event_core_commands, /* module directives */ NGX_EVENT_MODULE, /* module type */ NULL, /* init master */ ngx_event_module_init, /* init module */ ngx_event_process_init, /* init process */ NULL, /* init thread */ NULL, /* exit thread */ NULL, /* exit process */ NULL, /* exit master */ NGX_MODULE_V1_PADDING}; 能够看到,该模块定义了两个函数:ngx_event_module_init和ngx_event_process_init。Nginx启动过程中。在fork出worker进程之前调用ngx_event_module_init。这个函数做一些变量的初始化;在fork出worker进程之后调用ngx_event_process_init。该函数做了较多工作。流程图例如以下:

此函数的代码在下方,凝视中的标号和流程图中的标号相相应:
/* Nginx启动时在fork出worker子进程后调用 */static ngx_int_tngx_event_process_init(ngx_cycle_t *cycle){ ngx_uint_t m, i; ngx_event_t *rev, *wev; ngx_listening_t *ls; ngx_connection_t *c, *next, *old; ngx_core_conf_t *ccf; ngx_event_conf_t *ecf; ngx_event_module_t *module; ccf = (ngx_core_conf_t *) ngx_get_conf(cycle->conf_ctx, ngx_core_module); ecf = ngx_event_get_conf(cycle->conf_ctx, ngx_event_core_module); // 获得存储配置项的结构体 /* 1、确定使用负载均衡锁的条件 * 1.1 工作在master模式 * 1.2 配置文件里打开了负载均衡锁 * 1.3 worker进程数量大于1 */ if (ccf->master && ccf->worker_processes > 1 && ecf->accept_mutex) { ngx_use_accept_mutex = 1; /* 打开负载均衡锁 */ ngx_accept_mutex_held = 0; ngx_accept_mutex_delay = ecf->accept_mutex_delay; /* 拿不到锁时的延迟时间 */ } else { /* 2、关闭负载均衡锁 */ ngx_use_accept_mutex = 0; } /* 3、初始化红黑树实现的定时器 */ if (ngx_event_timer_init(cycle->log) == NGX_ERROR) { return NGX_ERROR; } for (m = 0; ngx_modules[m]; m++) { if (ngx_modules[m]->type != NGX_EVENT_MODULE) { continue; } /* ecf->use中保存了所使用的事件驱动模块的索引號 */ if (ngx_modules[m]->ctx_index != ecf->use) { continue; } module = ngx_modules[m]->ctx; /* 获得选中模块的通用接口 */ /* 4、初始化事件驱动模块模块 */ if (module->actions.init(cycle, ngx_timer_resolution) != NGX_OK) { /* fatal */ exit(2); } break; } /* 当配置文件里设置了timer_resolution配置项,进入这个块来控制时间精度 */ if (ngx_timer_resolution && !(ngx_event_flags & NGX_USE_TIMER_EVENT)) { struct sigaction sa; struct itimerval itv; ngx_memzero(&sa, sizeof(struct sigaction)); sa.sa_handler = ngx_timer_signal_handler; /* 信号处理函数 */ sigemptyset(&sa.sa_mask); if (sigaction(SIGALRM, &sa, NULL) == -1) { /* 安装信号处理程序 */ ngx_log_error(NGX_LOG_ALERT, cycle->log, ngx_errno, "sigaction(SIGALRM) failed"); return NGX_ERROR; } itv.it_interval.tv_sec = ngx_timer_resolution / 1000; itv.it_interval.tv_usec = (ngx_timer_resolution % 1000) * 1000; itv.it_value.tv_sec = ngx_timer_resolution / 1000; itv.it_value.tv_usec = (ngx_timer_resolution % 1000 ) * 1000; /* 5、设置时间间隔。依据配置项timer_resolution的值, * 每隔这么多毫秒回调ngx_timer_signal_handler方法。 * 该方法置位ngx_event_timer_alarm标志,表示须要更新时间 */ if (setitimer(ITIMER_REAL, &itv, NULL) == -1) { ngx_log_error(NGX_LOG_ALERT, cycle->log, ngx_errno, "setitimer() failed"); } } if (ngx_event_flags & NGX_USE_FD_EVENT) { struct rlimit rlmt; if (getrlimit(RLIMIT_NOFILE, &rlmt) == -1) { ngx_log_error(NGX_LOG_ALERT, cycle->log, ngx_errno, "getrlimit(RLIMIT_NOFILE) failed"); return NGX_ERROR; } cycle->files_n = (ngx_uint_t) rlmt.rlim_cur; /* 6、预先分配句柄 */ cycle->files = ngx_calloc(sizeof(ngx_connection_t *) * cycle->files_n, cycle->log); if (cycle->files == NULL) { return NGX_ERROR; } } /* 7、预先分配连接池 */ cycle->connections = ngx_alloc(sizeof(ngx_connection_t) * cycle->connection_n, cycle->log); if (cycle->connections == NULL) { return NGX_ERROR; } c = cycle->connections; // c指向连接池中的一个连接 /* 8、预先分配读事件。事件个数等于分配的连接个数 */ cycle->read_events = ngx_alloc(sizeof(ngx_event_t) * cycle->connection_n, cycle->log); if (cycle->read_events == NULL) { return NGX_ERROR; } rev = cycle->read_events; for (i = 0; i < cycle->connection_n; i++) { rev[i].closed = 1; rev[i].instance = 1;#if (NGX_THREADS) rev[i].lock = &c[i].lock; rev[i].own_lock = &c[i].lock;#endif } /* 9、预先分配写事件,事件个数等于分配的连接个数 */ cycle->write_events = ngx_alloc(sizeof(ngx_event_t) * cycle->connection_n, cycle->log); if (cycle->write_events == NULL) { return NGX_ERROR; } wev = cycle->write_events; for (i = 0; i < cycle->connection_n; i++) { wev[i].closed = 1;#if (NGX_THREADS) wev[i].lock = &c[i].lock; wev[i].own_lock = &c[i].lock;#endif } i = cycle->connection_n; next = NULL; do { i--; /* 10、ngx_cycle_t所包括的连接池中,c指向连接池, * 一个连接相应一个读事件和一个写事件 */ c[i].data = next; /* 以data作为next指针将连接池中的连接串起来 */ c[i].read = &cycle->read_events[i]; c[i].write = &cycle->write_events[i]; c[i].fd = (ngx_socket_t) -1; next = &c[i];#if (NGX_THREADS) c[i].lock = 0;#endif } while (i); /* 11、让free_connections指向空暇链表首部 */ cycle->free_connections = next; cycle->free_connection_n = cycle->connection_n; /* for each listening socket */ ls = cycle->listening.elts; for (i = 0; i < cycle->listening.nelts; i++) { /* 从空暇连接链表获得ngx_connection_t连接 */ c = ngx_get_connection(ls[i].fd, cycle->log); if (c == NULL) { return NGX_ERROR; } c->log = &ls[i].log; c->listening = &ls[i]; ls[i].connection = c; rev = c->read; /* 连接相应的读事件 */ rev->log = c->log; rev->accept = 1; /* 12、定义读事件消费方法,有连接请求事件时调用此方法建立新连接 */ rev->handler = ngx_event_accept; if (ngx_use_accept_mutex) { continue; } /* 13、将监听连接的读事件加入到epoll模块 */ if (ngx_add_event(rev, NGX_READ_EVENT, 0) == NGX_ERROR) { return NGX_ERROR; } } return NGX_OK;} 至此,ngx_event_core_module模块的启动工作完毕,接下来的工作交由epoll事件驱动模块ngx_epoll_module负责。它负责收集、分发等事件。
參考:
《深入理解Nginx》 P305-P310.